Instore Events November

November 2016

Free Instore Events 

Sat 12th: Card Making with Ruth Hamilton. Time: 11am- 4pm
Sat 19th: The Gemini Machine with Liz Hayes. Time: 11am- 4pm
Sat. 26th: docrafts Demonstration with Cliona Larkin.Time: 10am- 4pm


Junior Ideas Kids' Workshops
27th Nov: Christmas Santa Spoons
On going from 11am-4pm
5 euro per child. 5 years +
Workshops last approx. 25 minutes.
No booking required.A parent or guardian must remain instor

THANK YOU


A big THANK YOU to everyone who came to visit us at this years Knitting and Stitching Show. We met some lovely people: some new , some we've known for years.

Your support is very much appreciated !!

Instore Events this Autumn / Winter

Free Instore Demonstrations
October

Sat 15th: Quilted Halloween Doorhanger with Liz Hayes. Time: 11am- 4pm
20th - 23rd: Knitting and Stitching Show. RDS: Stand J55, see you there!
Sat 29th: Pumpkin Carving Demonstation. Time: 11am- 4pm
Sun 30th: Facepainting. Time: 12pm- 2pm

November

Sat 12th: Card Making with Ruth Hamilton. Time: 11am- 4pm
Sat 19th: The Gemini Machine with Liz Hayes. Time: 11am- 4pm
Sat. 26th: docrafts Demonstration with Cliona Larkin.Time: 10am- 4pm

December

Sat. 3rd: Hamper and Gift Wrapping Demonstration. Time: 11am- 4pm
Junior Ideas Kids' Workshops
2nd Oct: Halloween Tote Bag
9th Oct: Halloween Wreath
16th Oct: Halloween Lantern
23rd Oct: Halloween Pumpkin Mask
27th Nov: Christmas Santa Spoons
On going from 11am-4pm
5 euro per child.
5 years +
Workshops last approx. 25 minutes.
No booking required.
A parent or guardian must remain instore

Knitting and Stitching Show 2016

The highlight of the Irish crafting year ! 

Once again we'll be taking part so visit us on Stand J55 for great ideas, inspiration and new products.

Beat the queues and buy your tickets in advance at 
http://www.theknittingandstitchingshow.com/dublinUse code EX16 online for a discount !

Junior Ideas Childrens Workshops

Our first workshop of the season !! SUNDAY SEPTEMBER 25TH 11AM - 4PM Bring your junior crafters along and relax instore while they get creative. All materials supplied and there's no need to book. Just pop in and take a seat and crafting !
Ages 5+ - €5 per child. Workshops last approximatly 25 minutes

We're a Craft Award nominee !!

A huge Thank You to everyone who nominated us in the "Best Local Independent Craft Store" category in the 2016 Craft Awards. Please take a moment and vote for us to win :-)

CLICK HERE TO VOTE


Summers Nearly Over - It's Back to School and College Time !

 Can you believe summer is nearly over ?
If you have children heading back to school
,
we have lots of those essential but hard to find items instore.

 We stock nearly all the items you need for Home Economics or Art  and lots of them
are on special offer for a limited time ! 


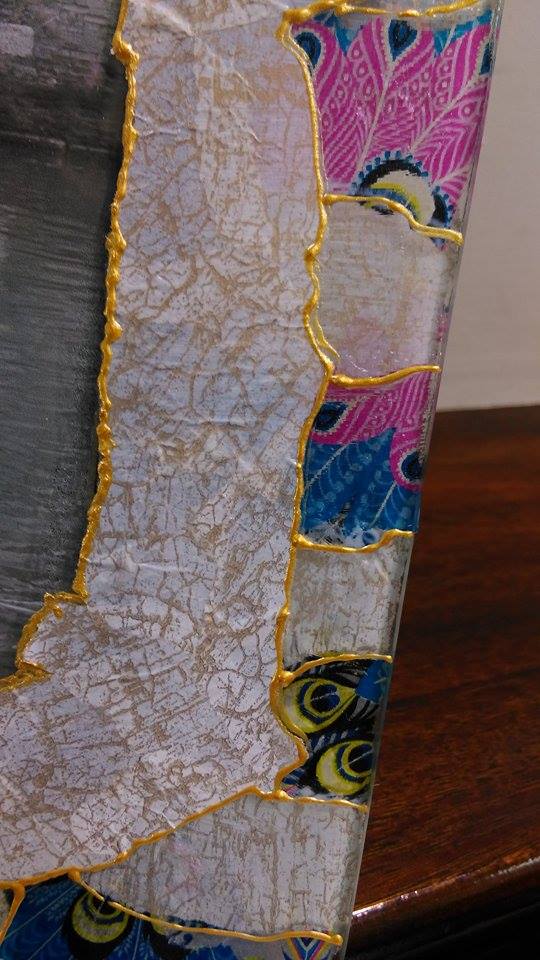
Decopatch Frame

 Decopatch and Cern Glass Frame How-To
With the weather after changing, its time, once again to think about what crafty projects you can do. Well- look no further.
With this quick decopatch how-to, you'll pass some of the time and end up with a stylish frame at the end of it.
This frame has a 3D effect, using decopatch on both sides of the glass!


You'll need:
-Glass Frame
-Two sheets decopatch paper
-Mod Podge glue (we used Gloss)
-Paintbrush
-Cern Outliner


Step One:
Decopatch roughly around the edge of where the photograph will be, try and cover any of the overlap onto the frame. Don't go the whole way over because you want to be able to see the decopatch through the edges of the glass.
Step Two:
Once dry, turn thh frame around and stick the decopatch paper design side up (I'm going to call this reverse decopatch!), and go the whole way around the back of the frame. You can use as many different types of paper as you like, so you can get your funky designs!
Step Three:
When all the decopatch is dry, seal it using your Mod Podge, and leave again to dry.
Step Four:
Take your cern outliner(we used the gold), and on the front of the frame, draw around all the top layer of the decopatch, this will really make that top layer stand out! After you've finished that, extend the lines over the decopatch thats on the back of the frame. So the cern will be on the front of the glass with the decopatch visible behind it. This will give it a jigsaw effect!

These frames make a fashionable addition to any bedroom! And all the products used here are available in store! 



Communion Sweet Trees

Its Communion time again! 
Our favourite Communion treat this year is a lovely marshmallow sweet-tree!
Our one here was done using a silver bucket and decorative moss to add some colour to the tree. Using white marshmallows we kept the colour of the occasion, but of course you can add a bit of colour with some brightly coloured ribbon either!
We used 2 inches squared of lace behind each marshmallow to really fill out the space and give it a nice full look. To decorate the dowel we used some 25mm white ribbon, roughly, a metre and a half (always better to have a bit more than a bit less), and we wrapped it around and glued the bottom with the glue gun. The moss hides the little bit at the bottom. To add a bit more to it, we added flowing bits of ribbon to three sides of it, about a metre, and pin it up using a bead and sequins pin. We used a lovely communion ribbon, white with gold writing, here to decorate, subtle but effective. 
The great thing about this is that it can be used again, just take off the poly ball and you can use the pot and dowel all over again! (It's okay, we won't tell!)
All products we used to make ours are in store, plus so many more bits and pieces to help you personalize your sweet-tree!

Have a look at our fantastic Flower Pot Man that the kids created last Sunday in the Junior Ideas Children's Workshop! Made using polystyrene eggs, mini flower pots and pipecleaners! Absolutely adorable little piece for coming into the sunny months!
Our next Children's Workshop is on the 29th of May, and the theme is Father's Day! Make sure to RSVP here so you don't miss out!
Happy Crafting!