
Decopatch Frame

 Decopatch and Cern Glass Frame How-To
With the weather after changing, its time, once again to think about what crafty projects you can do. Well- look no further.
With this quick decopatch how-to, you'll pass some of the time and end up with a stylish frame at the end of it.
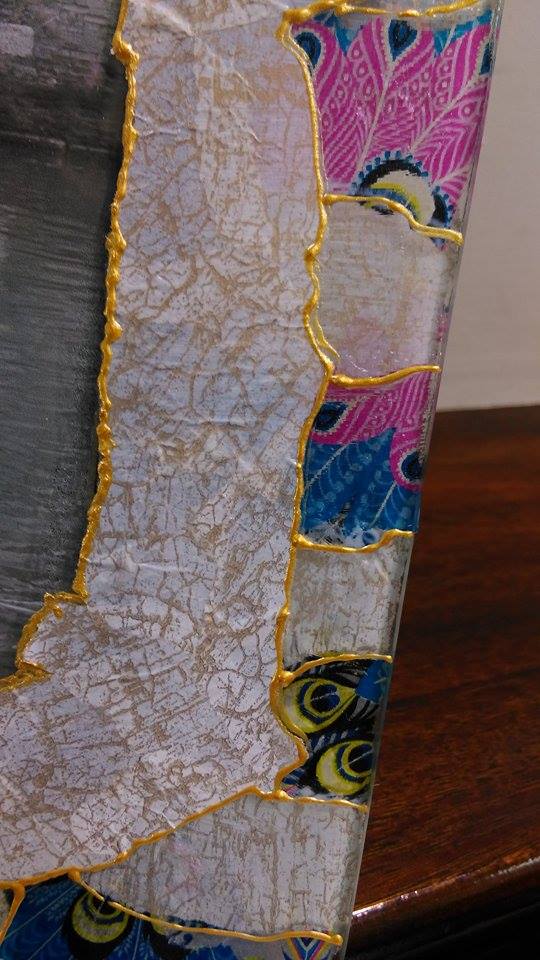
This frame has a 3D effect, using decopatch on both sides of the glass!


You'll need:
-Glass Frame
-Two sheets decopatch paper
-Mod Podge glue (we used Gloss)
-Paintbrush
-Cern Outliner



Step One:
Decopatch roughly around the edge of where the photograph will be, try and cover any of the overlap onto the frame. Don't go the whole way over because you want to be able to see the decopatch through the edges of the glass.
Step Two:
Once dry, turn thh frame around and stick the decopatch paper design side up (I'm going to call this reverse decopatch!), and go the whole way around the back of the frame. You can use as many different types of paper as you like, so you can get your funky designs!
Step Three:
When all the decopatch is dry, seal it using your Mod Podge, and leave again to dry.
Step Four:
Take your cern outliner(we used the gold), and on the front of the frame, draw around all the top layer of the decopatch, this will really make that top layer stand out! After you've finished that, extend the lines over the decopatch thats on the back of the frame. So the cern will be on the front of the glass with the decopatch visible behind it. This will give it a jigsaw effect!

These frames make a fashionable addition to any bedroom! And all the products used here are available in store! 


Communion Sweet Trees

Its Communion time again! 
Our favourite Communion treat this year is a lovely marshmallow sweet-tree!
Our one here was done using a silver bucket and decorative moss to add some colour to the tree. Using white marshmallows we kept the colour of the occasion, but of course you can add a bit of colour with some brightly coloured ribbon either!
We used 2 inches squared of lace behind each marshmallow to really fill out the space and give it a nice full look. To decorate the dowel we used some 25mm white ribbon, roughly, a metre and a half (always better to have a bit more than a bit less), and we wrapped it around and glued the bottom with the glue gun. The moss hides the little bit at the bottom. To add a bit more to it, we added flowing bits of ribbon to three sides of it, about a metre, and pin it up using a bead and sequins pin. We used a lovely communion ribbon, white with gold writing, here to decorate, subtle but effective. 
The great thing about this is that it can be used again, just take off the poly ball and you can use the pot and dowel all over again! (It's okay, we won't tell!)
All products we used to make ours are in store, plus so many more bits and pieces to help you personalize your sweet-tree!

Have a look at our fantastic Flower Pot Man that the kids created last Sunday in the Junior Ideas Children's Workshop! Made using polystyrene eggs, mini flower pots and pipecleaners! Absolutely adorable little piece for coming into the sunny months!
Our next Children's Workshop is on the 29th of May, and the theme is Father's Day! Make sure to RSVP here so you don't miss out!
Happy Crafting!

Junior Ideas Spring 2016

Our next set of Childrens Workshops will be held on
Sunday April 24th
Sunday May 29th

Come along and join a session
No need to book
Sessions last approximately 25 minutes & a parent/guardian must remain instore

€5 per session

Easy Easter Bonnets

We made this simple Easter bonnet from Funky Foam

Simply cut a kidney shape from a large sheet of foam, large enough that it will cover your childs head

Decorate one side - we used Decopatch paper and Mod Podge

Stick a length of ribbon across the decorated side- make sure it is long enough to tie in a bow

Add any special finishes - we added a lace trim so it looked like a traditional bonnet


Easter Craft Inspiration

Check out some amazing Easter projects you can make yourself!


Junior Ideas is back!

Junior Ideas Children's Workshops are back for another season. The first one will take place on February 28th and where all the children will create a unique and fun Mother's Day Card or if they prefer they can turn it into a birthday card etc

Workshops last approximately 25 minutes and cost €5 per child.
 

 No need to book just come along and take a seat. ( a parent or guardian must be in the store or cafe while the child takes part)

New Christmas Baubles for 2015

Just a few Christmas baubles and accessories photos to inspire on putting up your tree week ! 


November Workshops Open for Bookings

Weds. November 18th        Decorating with Decopatch               6.30 – 8.30pm      €25
During the evening you will learn all the techniques required to cover anything with Decopatch. Your new skills will impress all your friends! We will cover a wooden Tissue Holder with different Decopatch papers adding embellishments and effects if you wish. 


Thurs. November 19th        An Introduction to Acrylics                                6.30 – 8.30pm      €25
Artist John Carpenter will guide you through an evening of painting. You will learn beginner acrylic techniques as well as many tips while you create a finished piece to take home.

Weds. November 25th        Needle Felting for Beginners            6.30 – 8.30pm     €25
                                 You will learn to use wool fibres and specialist tools to make  a beautiful flower corsage


Thurs. November 26th       Beginners Watercolours           6.30 – 8.30pm     €25
                                             Join John Carpenter for a two hour class in starting Watercolours. You will complete a  painting  in during the evening learning lots of techniques and picking up expert tips along the way


Ring the shop on 01 8219277 or call in to book 

Octobers Events

JUNIOR IDEAS Craft Workshops for Kids
EVERY SUNDAY IN OCTOBER

No need to book - just drop in and join a session. Each workshop cost €5 per child ( 4 years+)  and last approximatly 25 minutes. Workshops run through out the day from 11am - 4pm. Last entry is at 3.30pm


A parent / guardian must stay instore during the workshops

Saturday, October 17th
PUMPKIN CARVING DEMONSTRATION
11am, 12pm, 2pm, 3pm


Saturday, October 24th
FACE PAINTING DEMONSTRATIONS for grown ups!
starts 1pm and takes place approximatly every 30 minutes
See how to paint a great face !
Arrive early if you want your face painted !